The Basic Key/Value Store Workflow
The Key/Value Store allows you to create temporary key/value pairs that can be accessed across different tests in your Organization. That means, you can create a key/value pair in test1 in projectA and use the value in test100 in projectZ.
What You'll Need
- A Sauce Labs account (Log in or sign up for a free trial license).
- An existing API Testing Project. For details on how to create one, see API Testing Quickstart.
- Familiarity with the API Testing Composer.
Basic Workflow: Set and Load Methods
In this example you will focus on setting and retrieving a value in the Key/Value Store.
-
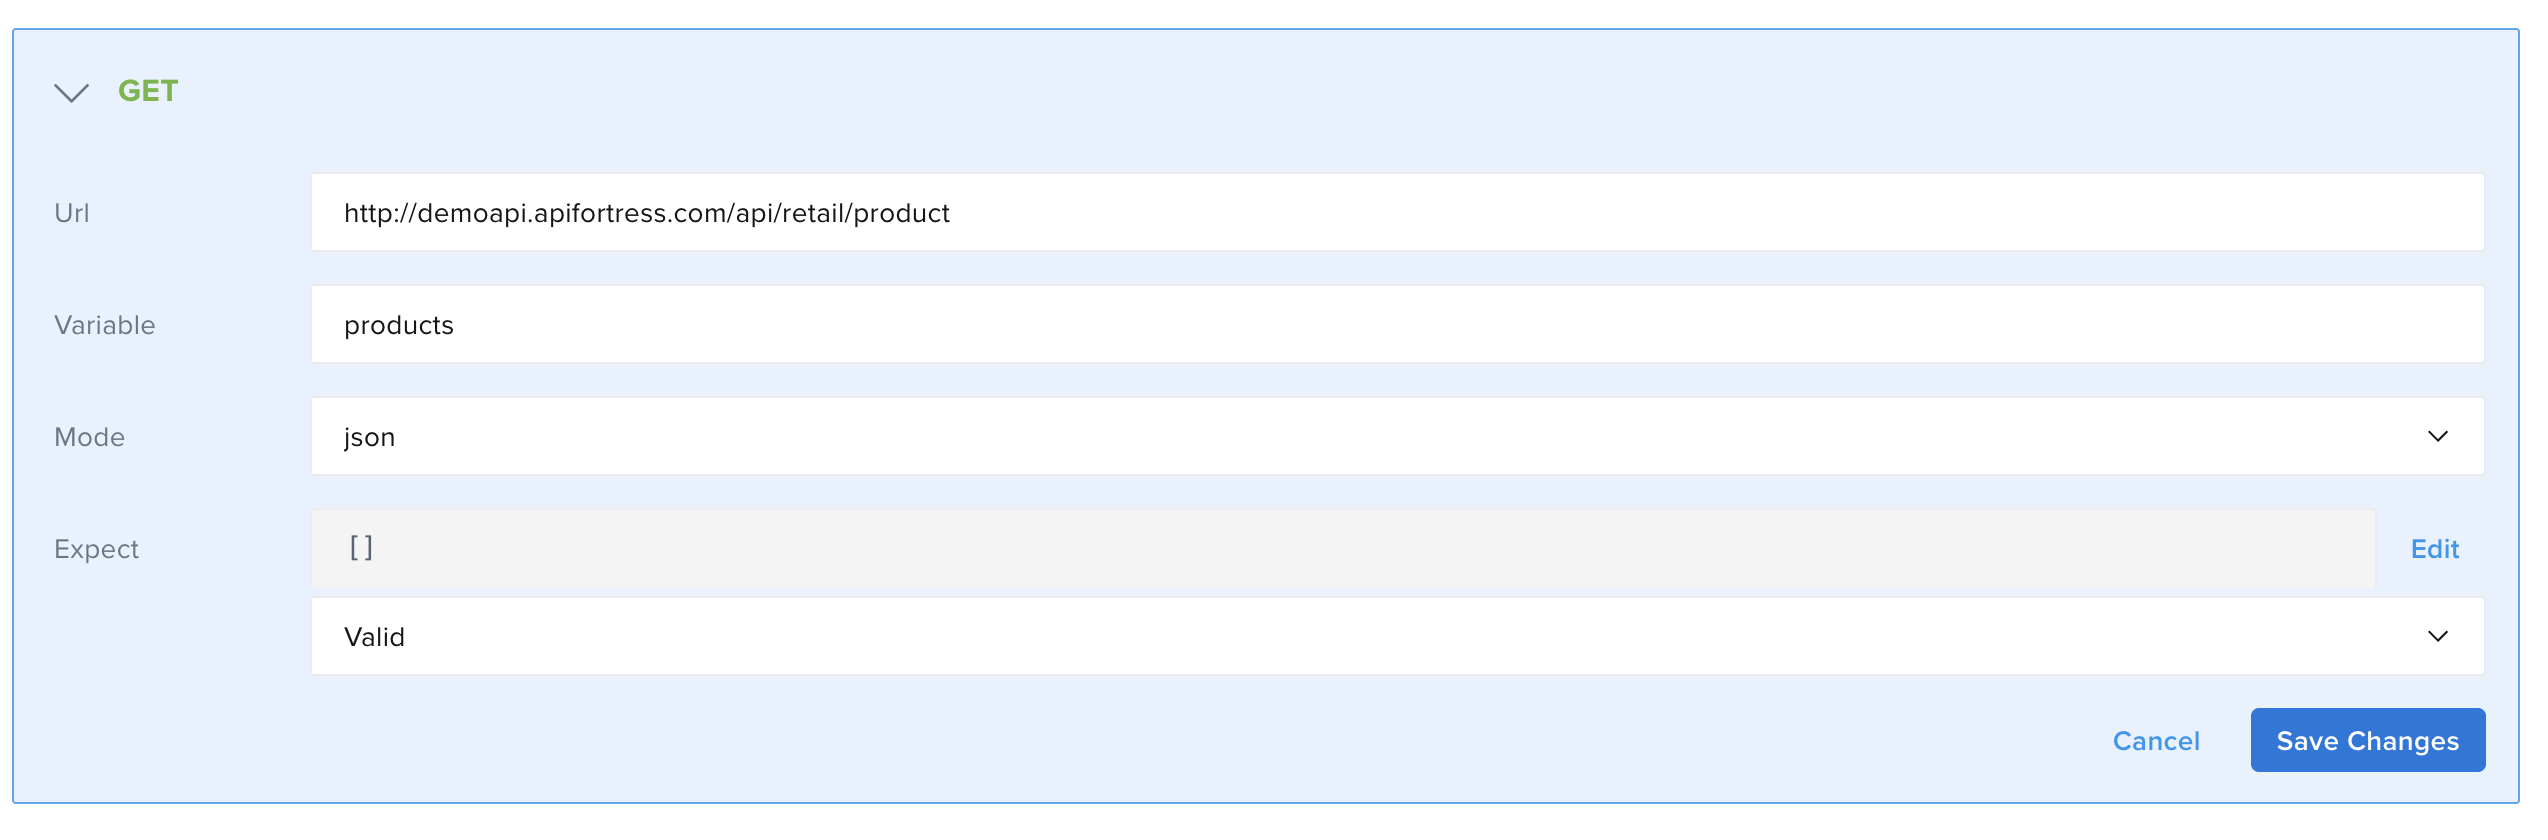
First, open the Composer and add the GET request.
- Url - for example
http://demoapi.apifortress.com/api/retail/product - Variable - for example
products - Mode - for example
json
- Url - for example
-
Click Save Changes.
-
Click Add Child Component, then add the Request Header to the request.
- Name - for example
key - Value - for example
ABC123
- Name - for example
-
Click Save Changes.
-
Add the K/V Store component and then, Save Changes.
- Action - for example
Set - Key - for example
prods - Data - for example
products[0].name
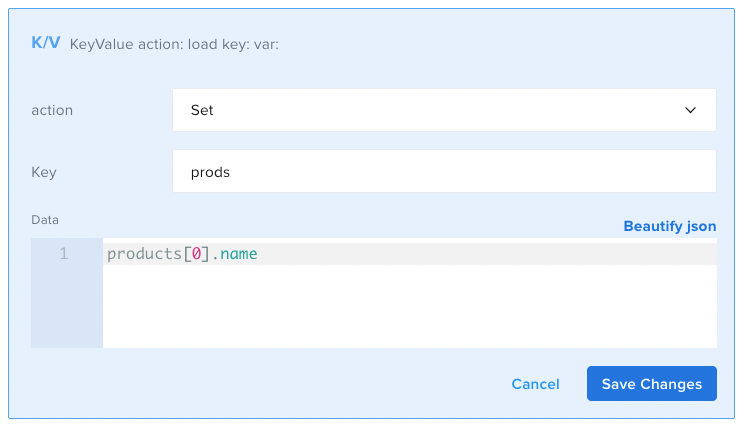
In this step, you set the Key/Value pair in the store. In this case,
prodsequalsproducts[0].name, which evaluates toBaseball Cap. - Action - for example
-
Next, add another K/V Store component.
- Action - for example
Load - Key - for example
prods - Variable - for example
kvprods
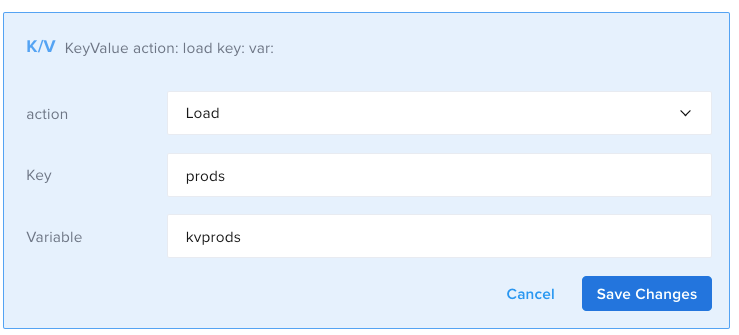
In this step, you retrieve the Key/Value pair from the store. In this example, we assign the retrieved value to the variable
kvprods. - Action - for example
-
Click Save Changes.
-
Add a Comment component and then Save Changes.
- Comment - for example
${kvprods}
This will print the value and you can ensure that the data is recovered successfully.
- Comment - for example
-
The final result looks like:
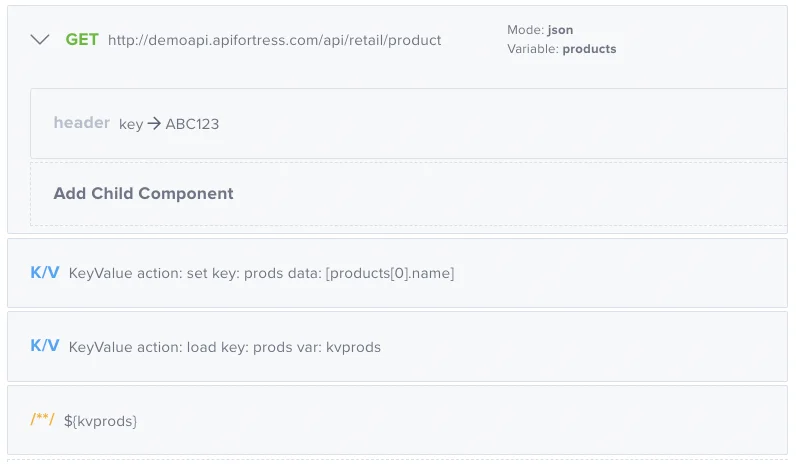
- id: get
  children:
    - id: header
      name: key
      value: ABC123
  url: http://demoapi.apifortress.com/api/retail/product
  var: products
  mode: json
- id: kv
  key: prods
  action: set
  object: products[0].name
- id: kv
  key: prods
  action: load
  var: kvprods
- id: comment
text: ${kvprods} -
Run the test.
Push/Pop Workflow
In the next example, you will take a look at how Push and Pop methods work. Push and Pop are both array methods and behave as they normally do outside of this context: Push will append a value to the end of an array, and Pop will remove the last value in an array.
Step 1: Push
In this step, you will Push the data onto the array.
-
First, open the Composer and add the GET request.
- Url - for example
http://demoapi.apifortress.com/api/retail/product - Variable - for example
products - Mode - for example
json
- Url - for example
-
Click Save Changes.
-
Click Add Child Component, then add the Request Header to the request.
- Name - for example
key - Value - for example
ABC123
- Name - for example
-
Click Save Changes.
-
Add the K/V Store component.
- Action - for example
Set - Key - for example
prods - Data - for example
[products[0].color]
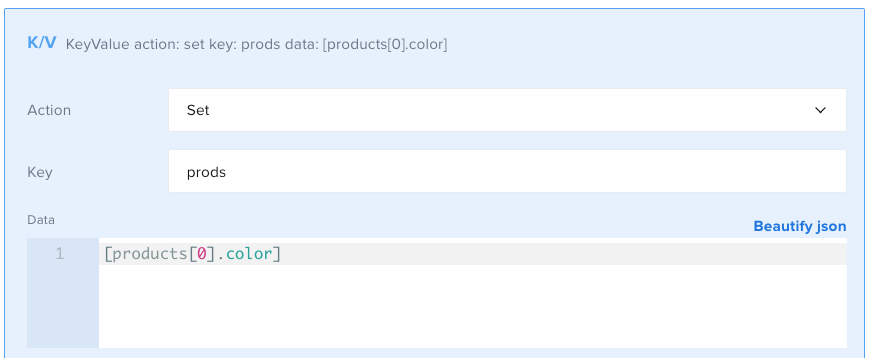
This step assigns a key in the Key/Value Store to a value from the response payload. In this case, use
color, which is an array. - Action - for example
-
Click Save Changes.
-
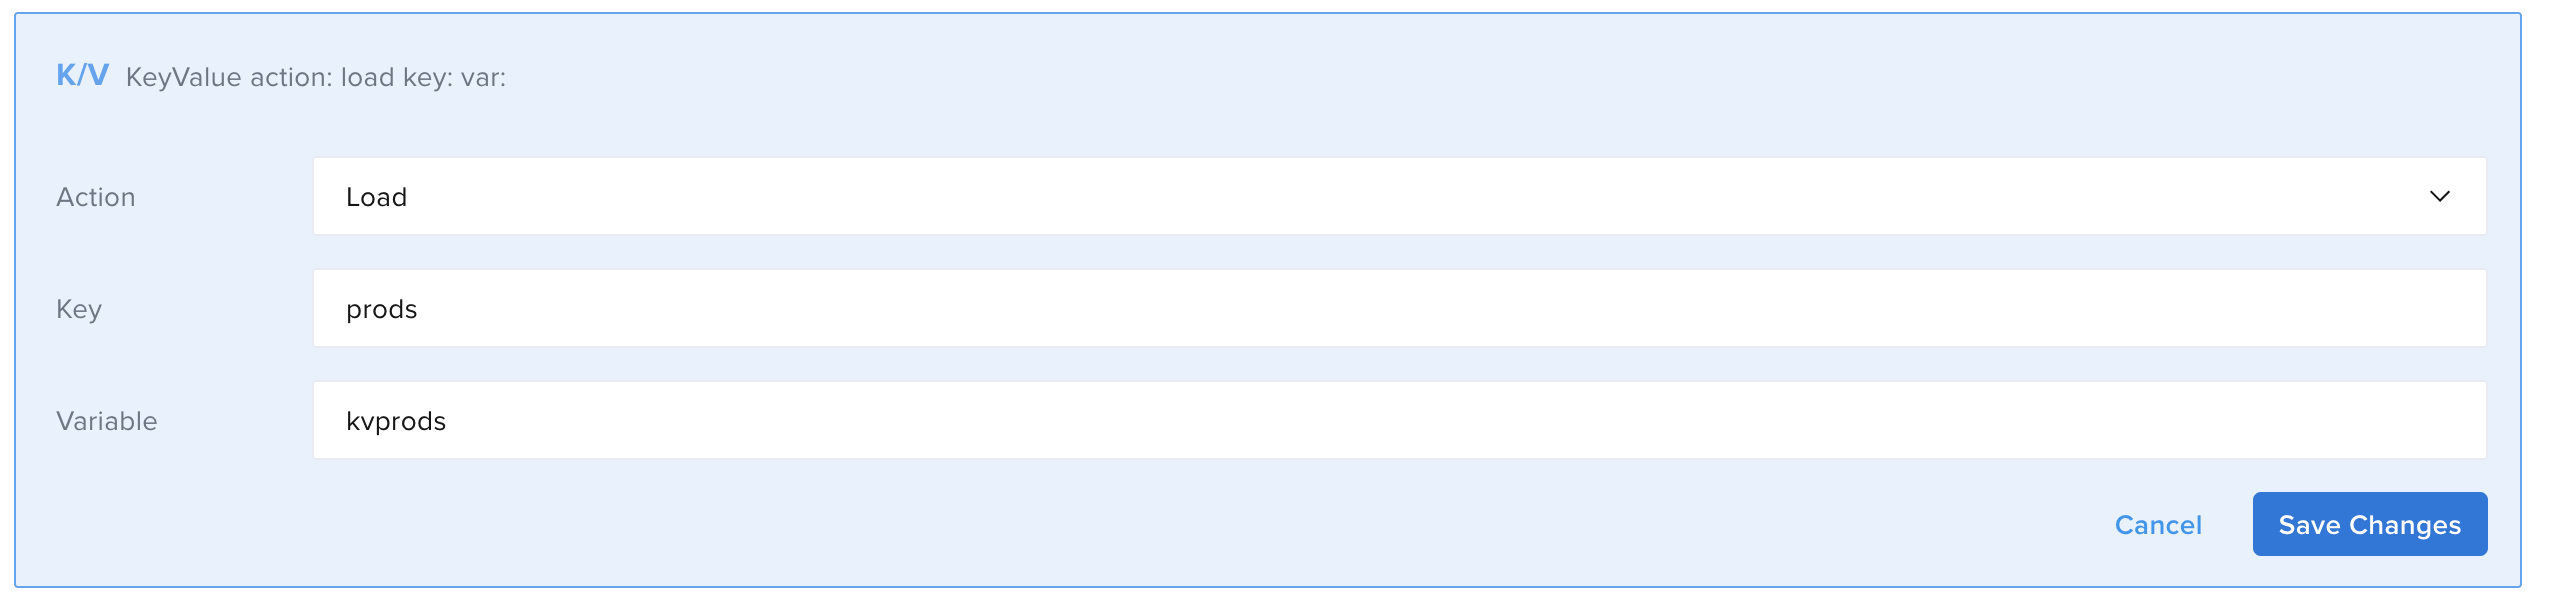
Next, add another K/V Store component.
- Action - for example
Load - Key - for example
prods - Variable - for example
kvprods
In this step, you retrieve the Key/Value pair from the store. In this example, assign the retrieved value to the variable
kvprods. - Action - for example
-
Click Save Changes.
-
Add a Comment component.
- Comment - for example
${kvprods}
The comment will print the value on the test report so you can see the change at the end of this workflow.
- Comment - for example
-
Next, add a new K/V Store component.
- Action - for example
Push - Key - for example
prods - Data - for example
999
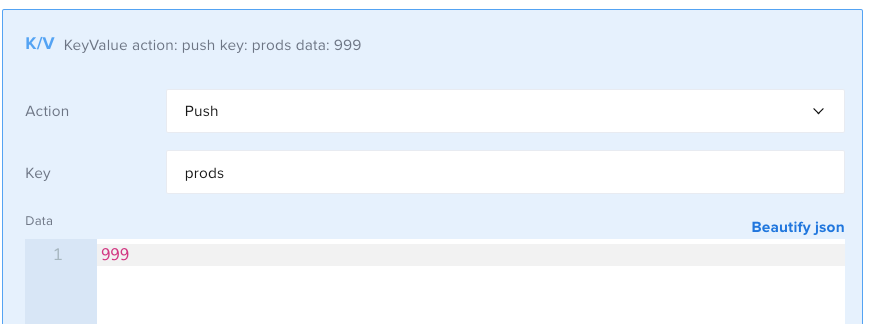
- Action - for example
In this step, you push the new data onto the end of the existing array. In this example, you push the integer 999 onto the prods array.
-
Click Save Changes.
-
Add a new K/V Store component.
- Action - for example
Load - Key - for example
prods - Variable - for example
kvprods
- Action - for example
In this step, you load the modified data into the test from the Key/Value Store.
-
Click Save Changes.
-
Add a Comment component.
- Comment - for example
${kvprods}
- Comment - for example
This will print the value so you can see the changes on the test report.
-
Click Save Changes.
-
Run the test.
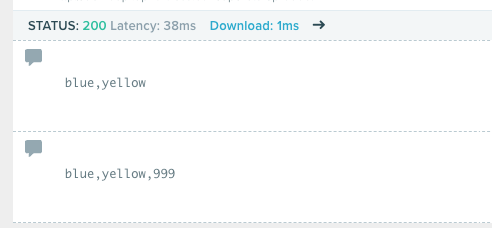
The test report shows that you have pushed the number 999 onto the array stored in the key prods.
Step 2: Pop
In this step, you will remove the data with Pop.
-
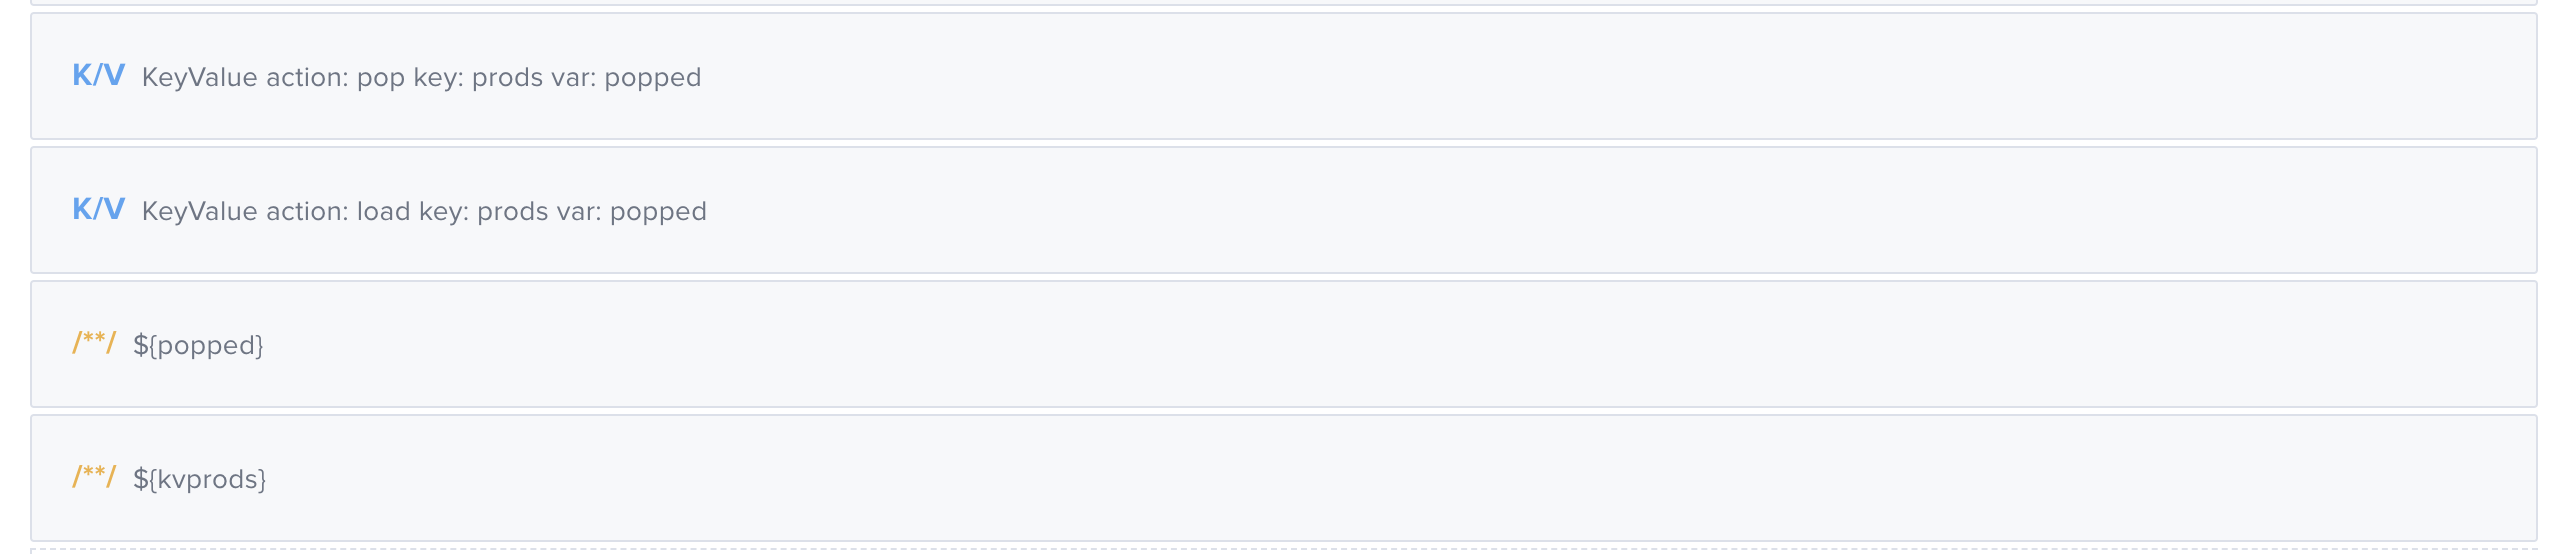
Add a new K/V Store component.
- Action - for example
Pop - Key - for example
prods - Variable - for example
popped
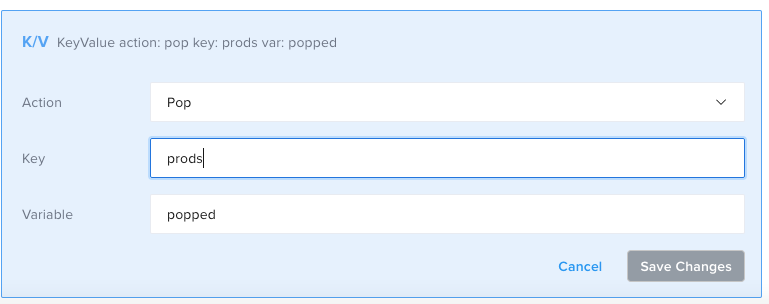
In this step, you provide the name of the key from the Key/Value Store (
prods), and the name of the variable you would like to assign the popped value to (popped). - Action - for example
The Pop method removes the last value in an array and returns the value itself.
-
Click Save Changes.
-
Add a new K/V Store component.
- Action - for example
Load - Key - for example
prods - Variable - for example
kvprods
In this step, you load the modified key from the Key/Value Store.
- Action - for example
-
Click Save Changes.
-
Add a Comment component.
- Comment - for example
${popped}
This will print the popped value so you can see it on the test report.
- Comment - for example
-
Click Save Changes.
-
Add a Comment component.
- Comment - for example
${kvprods}
This will print the final state of the array in the K/V Store so you can see the changes on the test report.
- Comment - for example
-
Click Save Changes.
-
The second part of the test looks like:
    - id: kv
      key: prods
      action: pop
      var: popped
    - id: kv
      key: prods
      action: load
      var: popped
    - id: comment
      text: ${popped}
    - id: comment
text: ${kvprods} -
Run the test.
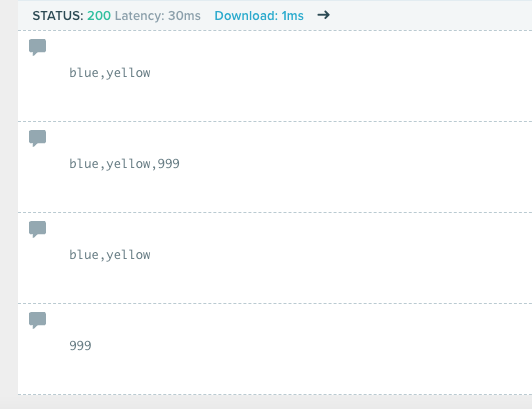
The report for the full workflow shows that you first assigned an array to the Key/Value Store with the Set method, then added a value to that array with Push, and then removed the value with Pop. Each time there's a change, you used Load to retrieve an updated value from the Key/Value Store. The last two comments show the final state of the array in the Key/Value Store and the popped value itself. The popped value will only be available in the scope of this test run. The array in the Key/Value Store will remain retrievable until 24 hours after its most recent modification.
Use Set, Push, and Pop to reset the timer. Load does not reset the timer.