Setting Up SSO - Special Cases
Enterprise Plans only
NameID is not a real email address but a user identifier
Problem Description
In some cases, the NameID in the SAML assertion is not a real email address but an identifier. This user identifier is immutable. Users in your Identity Provider have also been assigned email addresses that can change at any time.
You want to use this user identifier to match users in Sauce Labs, but you also want to provide the real email address to Sauce Labs.
Solution
- If the user identifier is not an email address, ensure to send it in the NameID field as an email address. This format is required by the Sauce Labs Service Provider. Simply put the user identifier in the NameID field and add your company's dummy domain to it. For example, if the user identifier is
john.doe, the NameID should bejohn.doe@your.company.domain. - Send the real email address in the SAML claim
contact_email.
Keep in mind that the value of contact_email will be used as the primary email address for the user in Sauce Labs. If the contact_email changes and the user logs in to Sauce Labs, the email address in Sauce Labs will be updated.
The contact_email must be an email address not used by any other user in Sauce Labs.
Single Identity Provider and Multiple Organizations at Sauce Labs
Problem Description
Some identity providers do not allow creating more than one SAML integration with the same service provider. In other words, they require one unique entity ID for a service provider. If your Identity Provider has this limitation and you have two organizations at Sauce Labs to integrate with SAML SSO for that Identity Provider, follow the setup steps below:
Solution
-
In your Identity Provider set up the first SAML SSO integration/application in the standard way.
-
Integrate the SAML SSO application that you created in the previous step with one of your Sauce Labs organizations.
-
In your Identity Provider set up another SAML SSO integration/application with the auxiliary Sauce Labs Service Provider. You cannot use a preconfigured Sauce Labs SAML application from your identity provider's catalog for this purpose. Instead, you must create a custom SAML application, as it requires different metadata than the preconfigured one.
-
You have to use different Sauce Labs metadata. Sauce Labs provides four auxiliary Service Providers with different entity IDs. You can find the metadata for each auxiliary Service Provider below:
-
The metadata contains different entity ID and different ACS URLs (
spXinstead ofsp), whereXis a number from 1 to 4. -
In this tutorial we will use the metadata for the auxiliary SP with entity ID
sp1. But if you for example want to use the auxiliary SP3, remember to putsp3in all places in the configuration in your IdP instead ofsp1. -
Here is an example of the attributes for the auxiliary Sauce Labs SP with entity ID
sp1that differ from the standard setup withsp:Setting Value Entity ID https://accounts.saucelabs.com/sp1Audience URI https://accounts.saucelabs.com/sp1Assertion Consumer Service https://accounts.saucelabs.com/am/AuthConsumer/metaAlias/authtree/sp1Recipient URL https://accounts.saucelabs.com/am/AuthConsumer/metaAlias/authtree/sp1Destination URL https://accounts.saucelabs.com/am/AuthConsumer/metaAlias/authtree/sp1 -
All other settings are the same as in the standard service provider.
-
-
Keep in mind that the SAML SSO application that you have created in the previous step has to have different Identity Provider Entity ID (
issuer) than the first one. This is mandatory because Sauce Labs Service Provider does not allow duplicate IdP entity IDs. This is an issue in standard setup with a single tenant in some identity providers, such as Azure Active Directory or Auth0. Every SAML app that you create within the same tenant will have the same entity ID in metadata and in the SAMLRequest. Follow the steps below for your identity provider:-
Azure Active Directory provides a solution for this multi-instancing setup. Follow the below steps to set up multiple Sauce Labs SAML applications within the single Azure tenant:
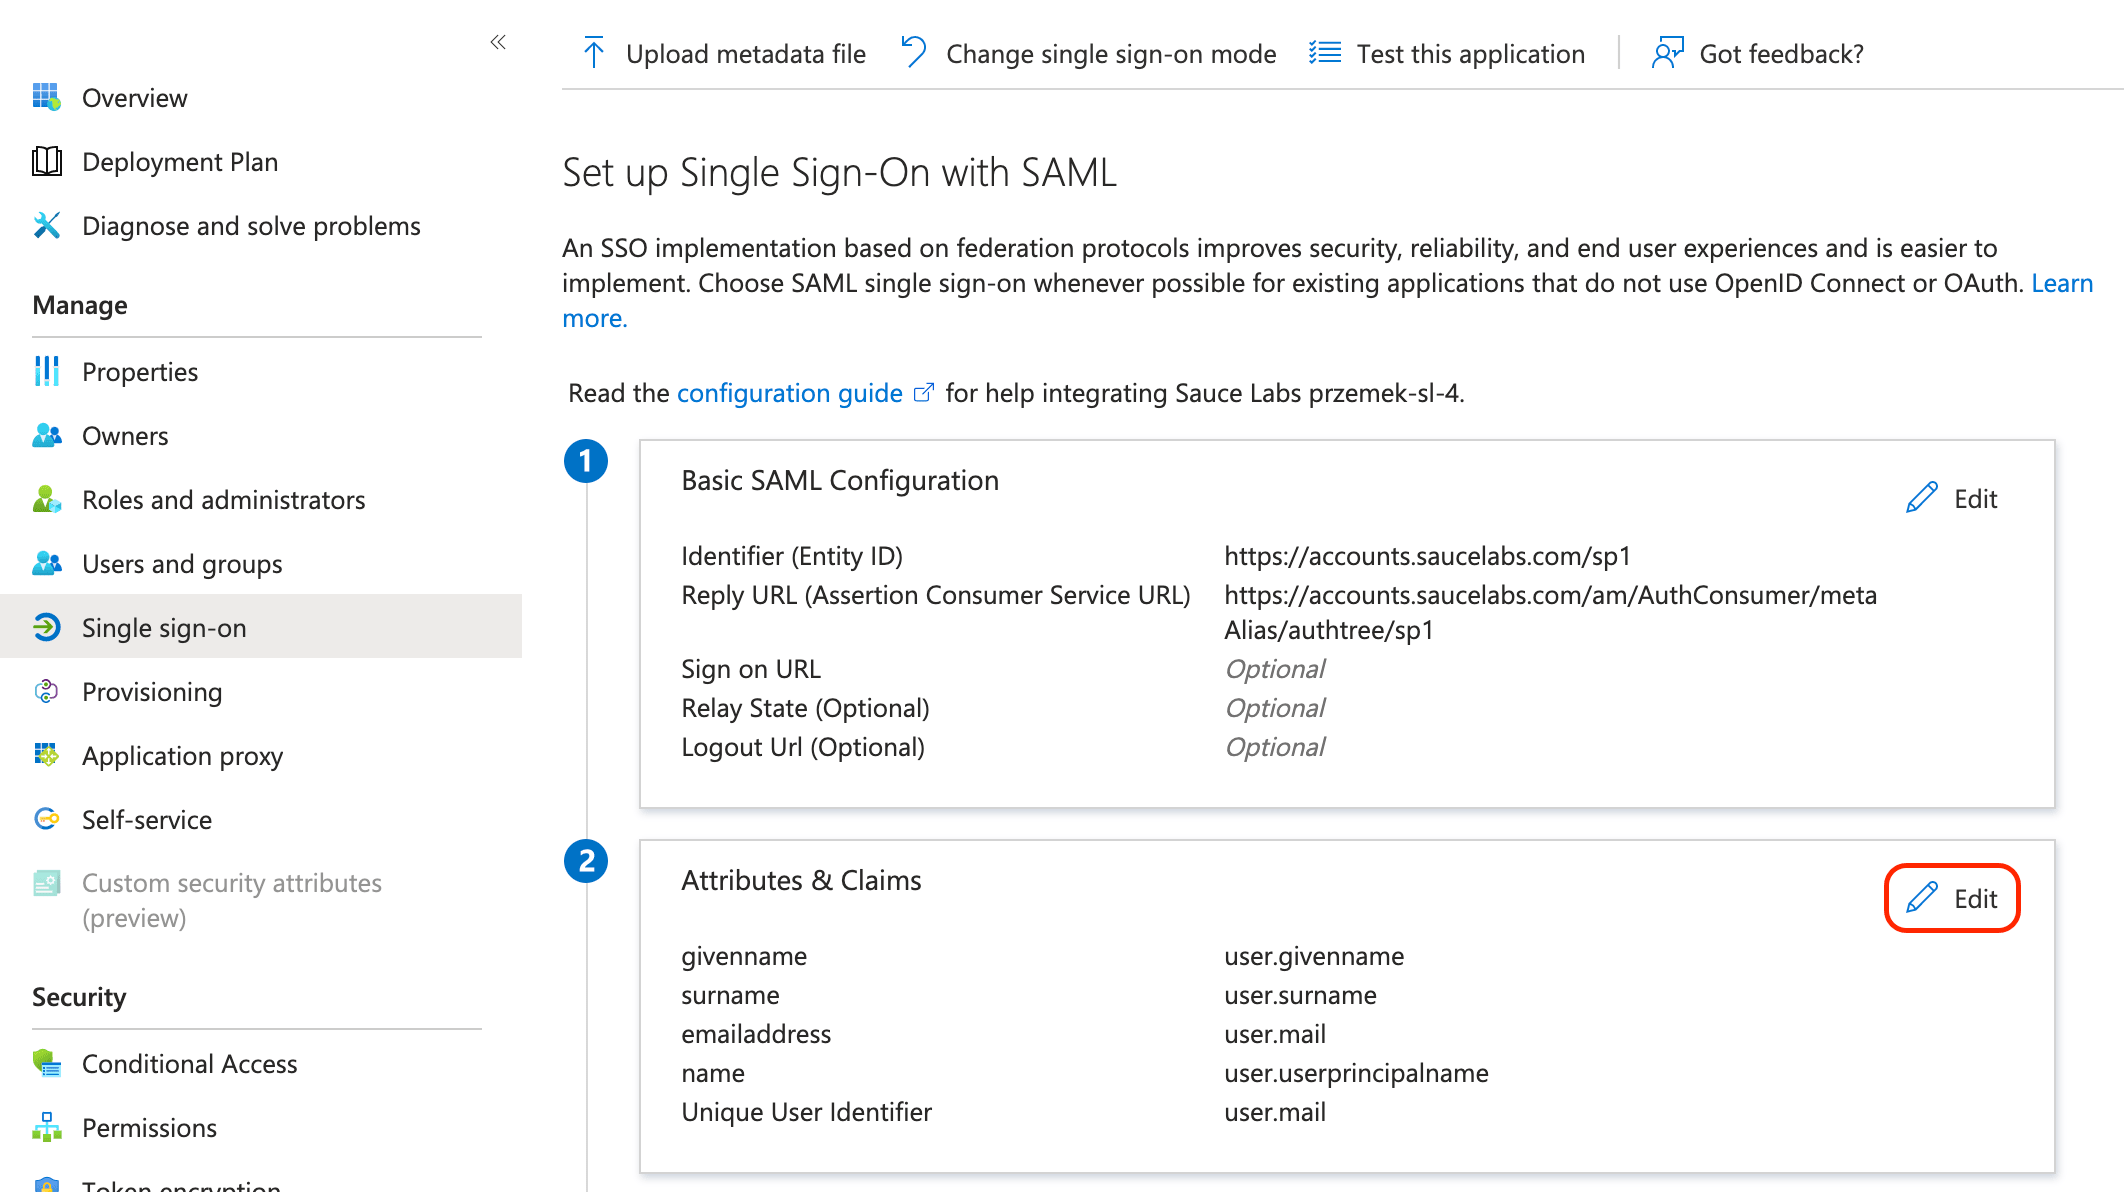
- Once you set up successfully the new SAML app in Azure in the step #3, Go to Single sign-on settings of your Azure app and click Edit in the section Attributes & Claims.
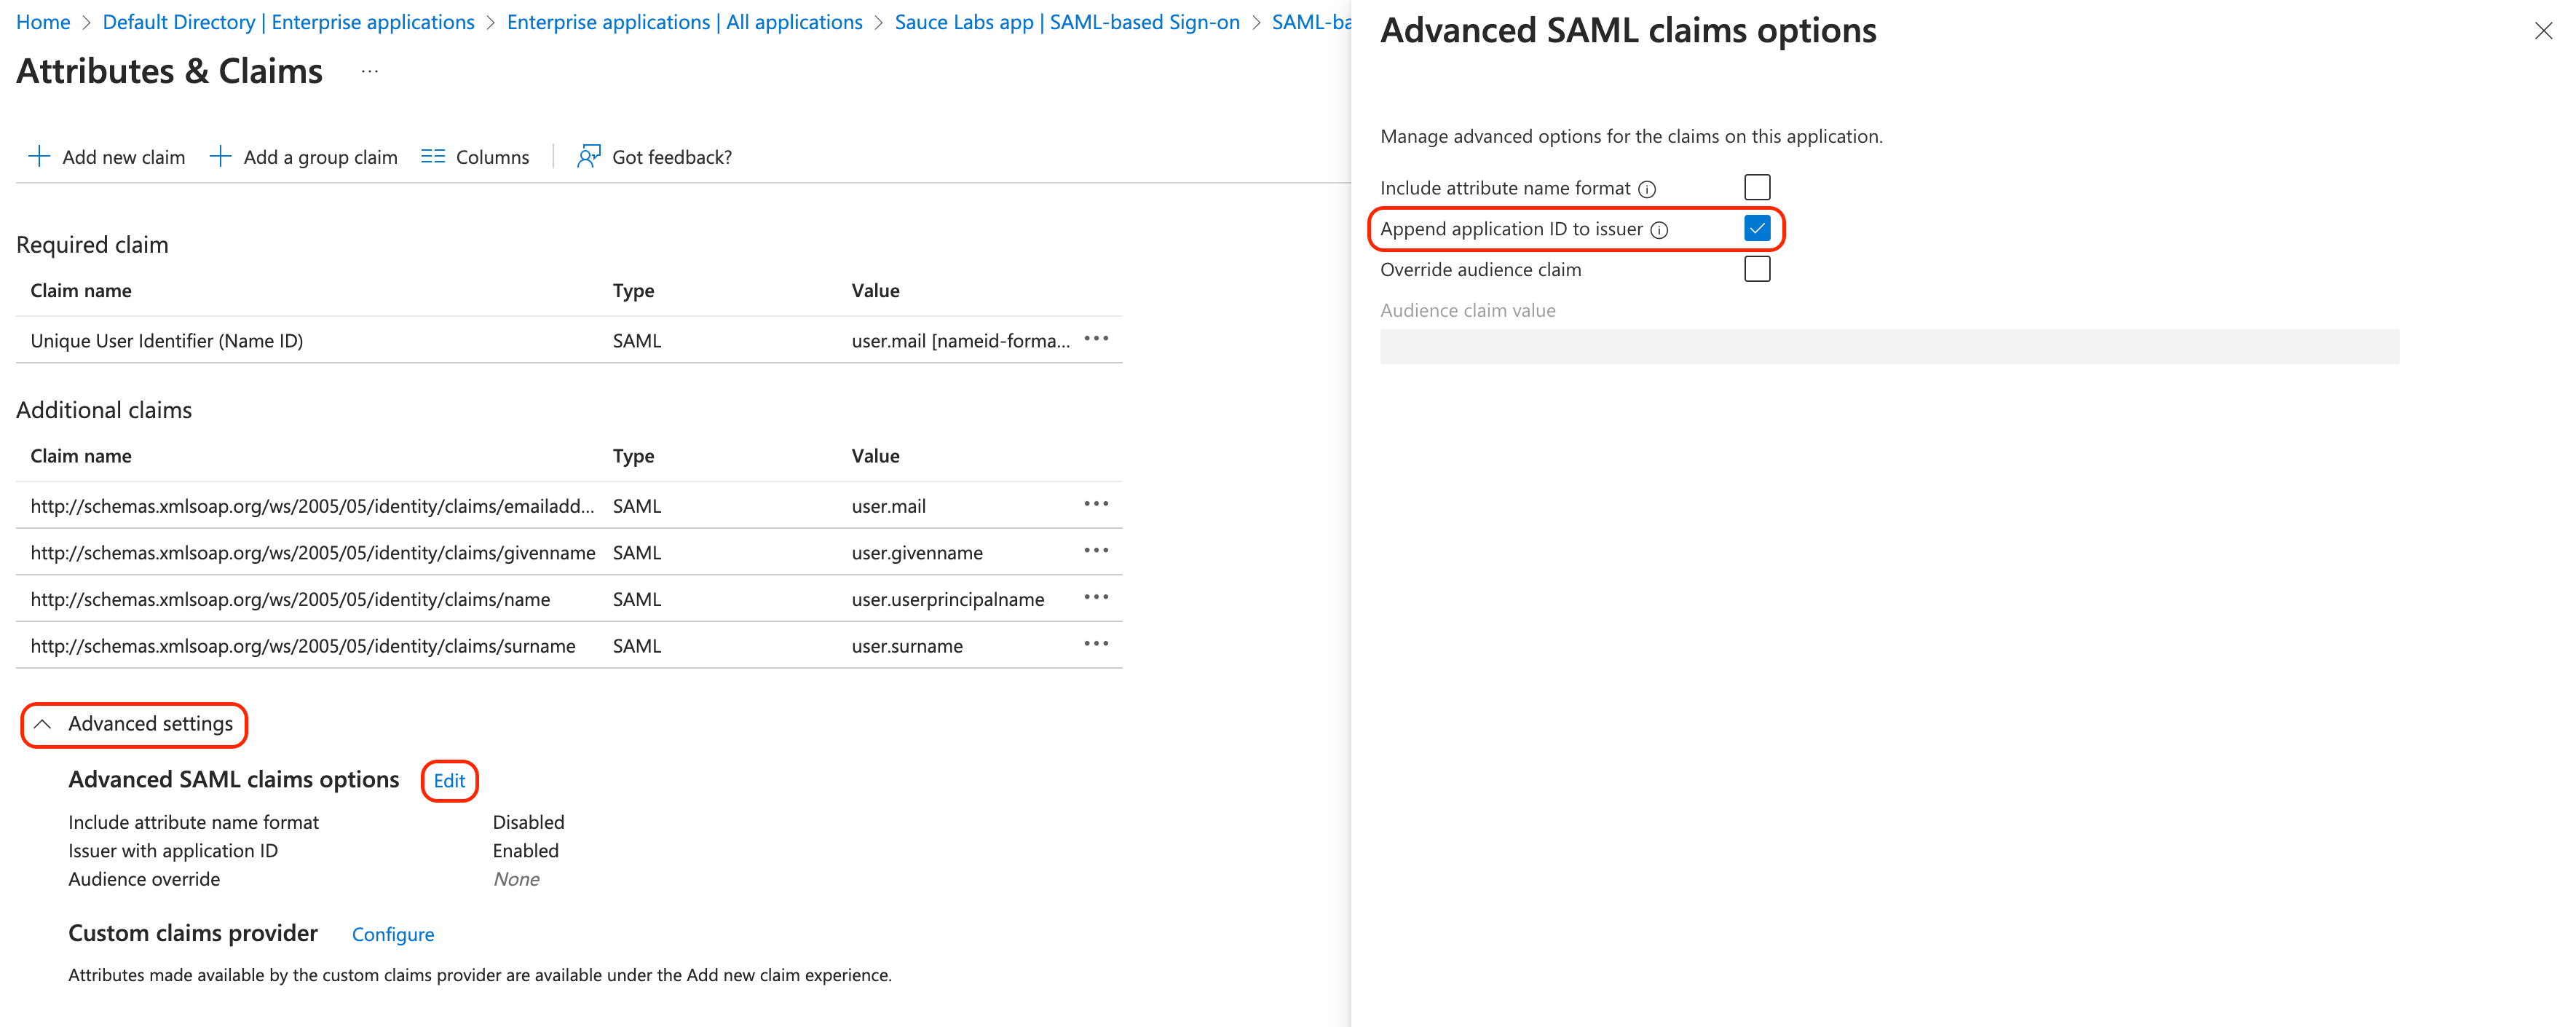
- In Advanced settings edit Advanced SAML claims options and select the checkbox Append application ID to issuer.
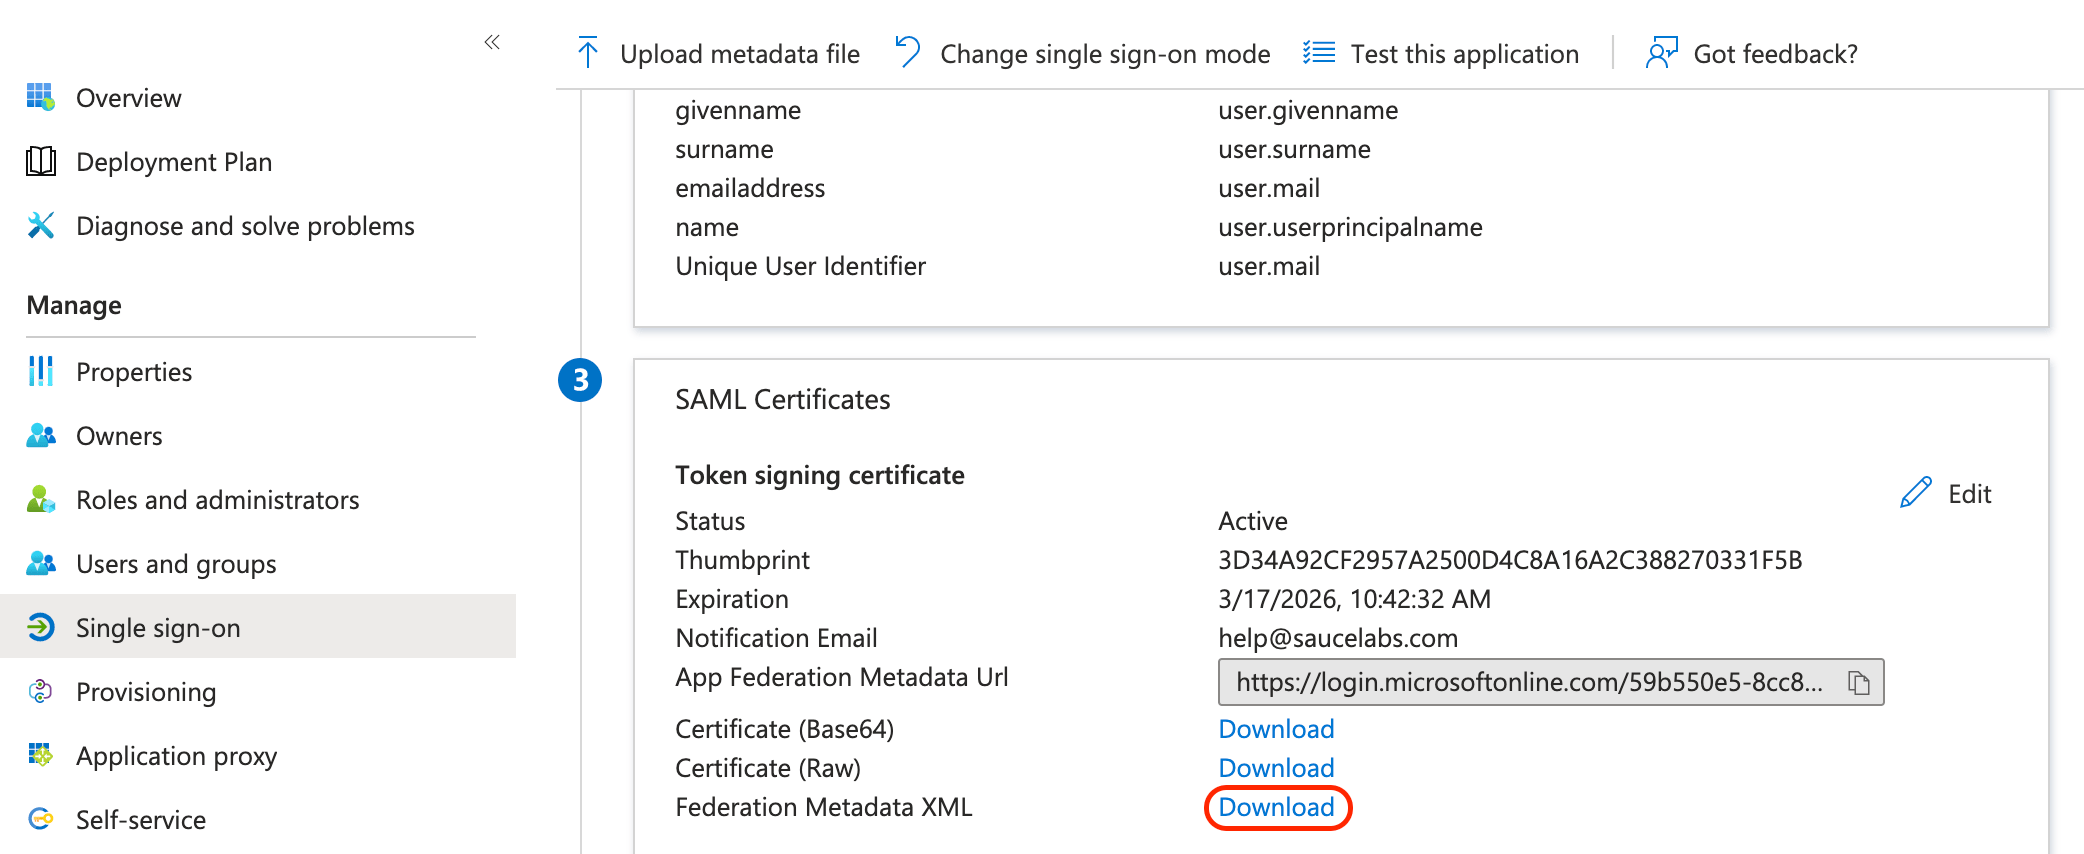
- Download the metadata file of your Azure app.
- Next, before you upload metadata in Sauce Labs UI (step #5), you have to append Azure application ID to entity ID in metadata. Copy the application ID in the tab Overview.
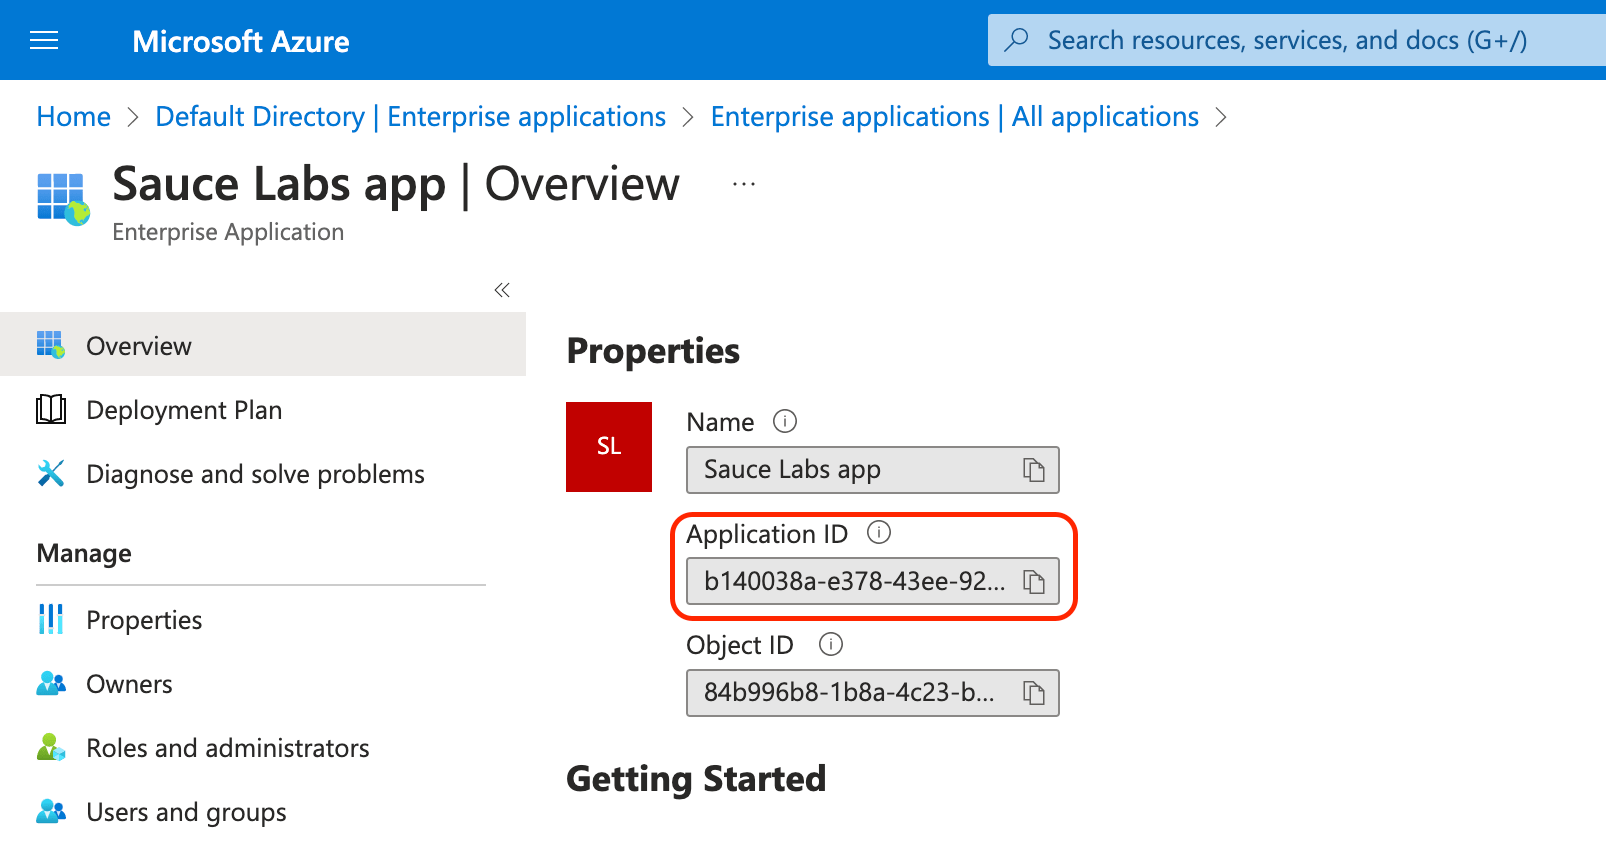
- Open the metadata file in a text editor, append the app ID to the attribute
entityIDand save the file. You will upload this modified metadata file in Sauce Labs UI in the step #5.
- Once you set up successfully the new SAML app in Azure in the step #3, Go to Single sign-on settings of your Azure app and click Edit in the section Attributes & Claims.
-
Auth0 requires adding a custom attribute (
issuer) to the SAML assertion configuration. Follow the below steps to set up multiple Sauce Labs SAML applications within the single Auth0 tenant:-
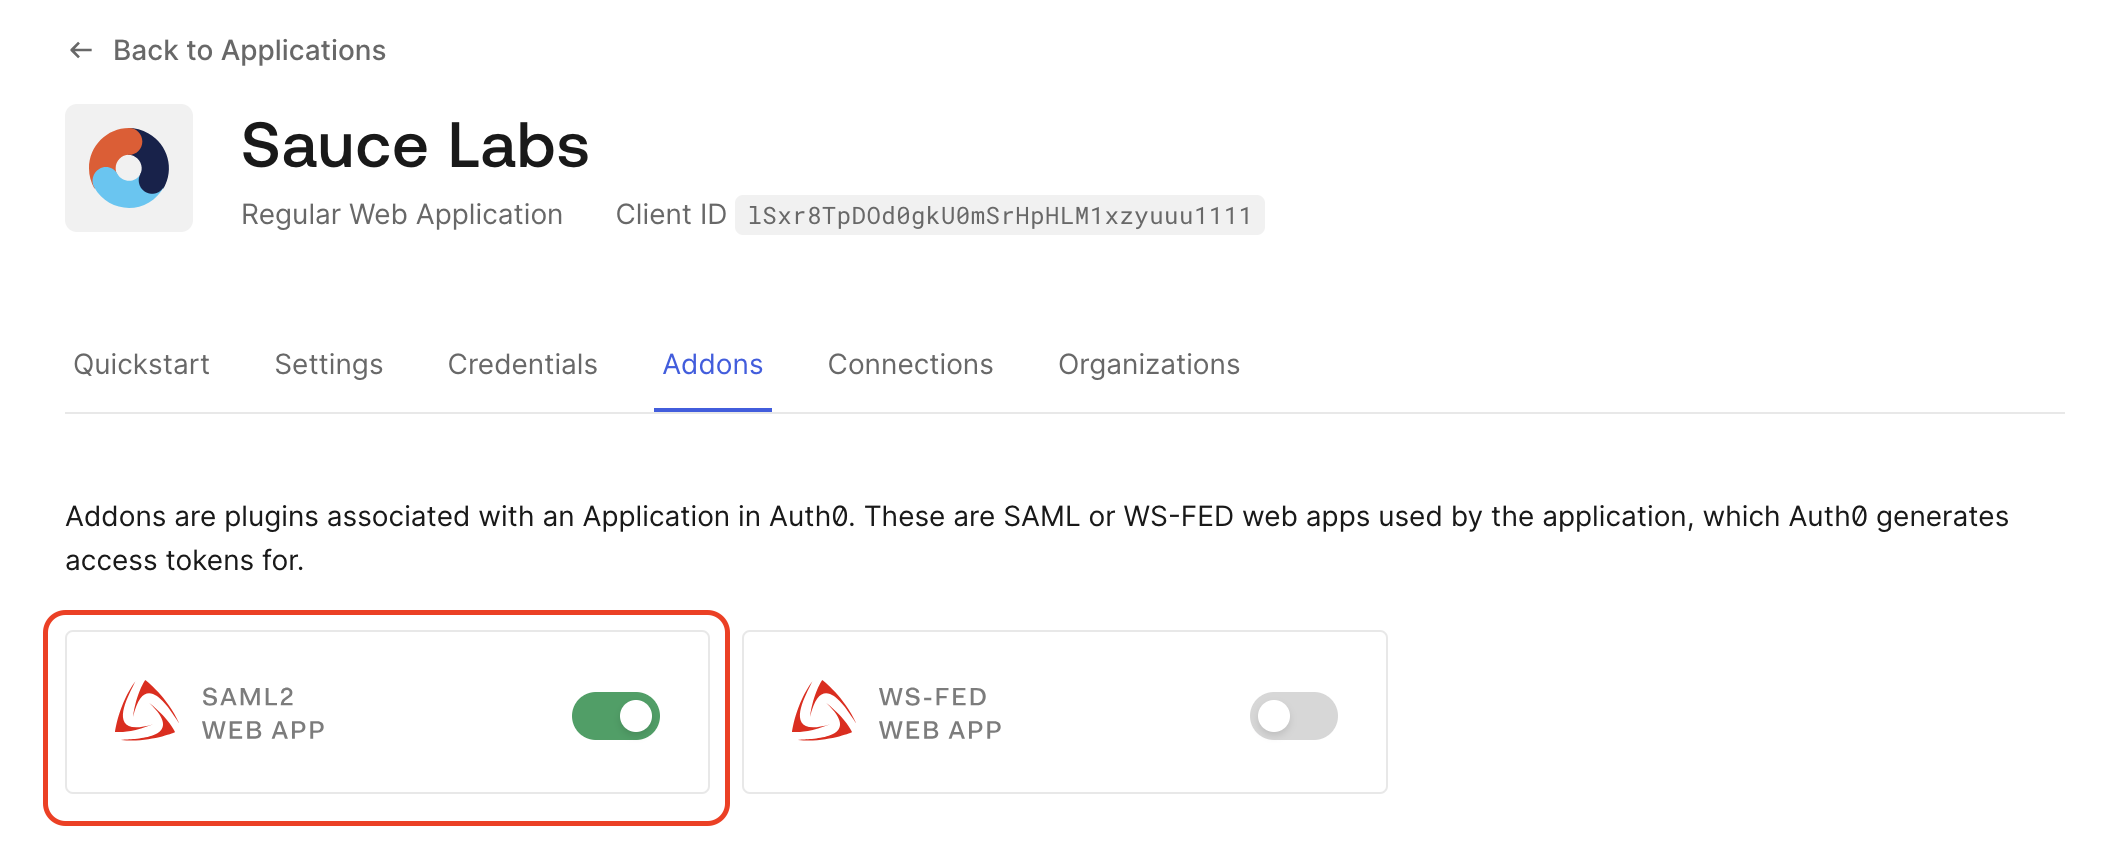
Once you set up successfully the new SAML app in Auth0 in the step #3, go to Addons tab of your Auth0 app and click SAML2 WEB APP.
-
Go to Settings tab and fill in the following fields:
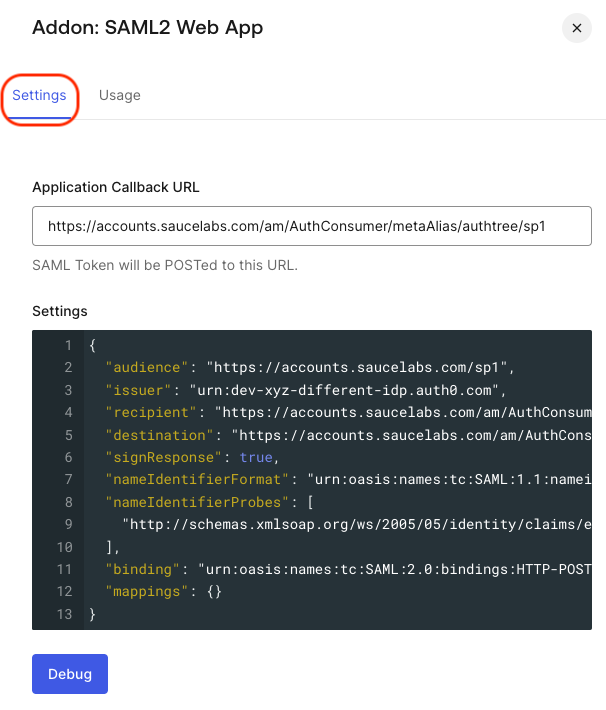
- Application Callback URL:
https://accounts.saucelabs.com/am/AuthConsumer/metaAlias/authtree/sp1 - Settings:
- The extra attribute, compared to the standard setup, is issuer. This attribute's value must be a unique entity ID for this SAML application, distinct from the entity ID used in the first SAML application created in step #1.
- Please note that the Service Provider entity ID for this application is
sp1, different from thespused in the first SAML application.
{
   "audience": "https://accounts.saucelabs.com/sp1",
   "issuer": "<CUSTOM-SAML-APP-ENTITY-ID>",
   "recipient": "https://accounts.saucelabs.com/am/AuthConsumer/metaAlias/authtree/sp1",
   "destination": "https://accounts.saucelabs.com/am/AuthConsumer/metaAlias/authtree/sp1",
   "signResponse": true,
   "nameIdentifierFormat": "urn:oasis:names:tc:SAML:1.1:nameid-format:emailAddress",
   "nameIdentifierProbes": [
      "http://schemas.xmlsoap.org/ws/2005/05/identity/claims/emailaddress"
   ],
   "binding": "urn:oasis:names:tc:SAML:2.0:bindings:HTTP-POST",
   "mappings": {}
}
- Application Callback URL:
-
Go to the Usage tab and download the metadata file of this Auth0 app.

-
Next, before you upload metadata in Sauce Labs UI (step #5), you have to set the custom entity ID in metadata. Copy the issuer value (
<CUSTOM-SAML-APP-ENTITY-ID>) from the SAML app settings. Open the metadata file in a text editor, paste the custom issuer value to the attributeentityIDand save the file. You will upload this modified metadata file in Sauce Labs UI in the step #5.
-
-
-
Integrate the SAML SSO application that you created using the auxiliary metadata (
sp1) with the other Sauce Labs organization.- Upload the SAML metadata file in the Sauce Labs Organization Management UI provided by your IdP.
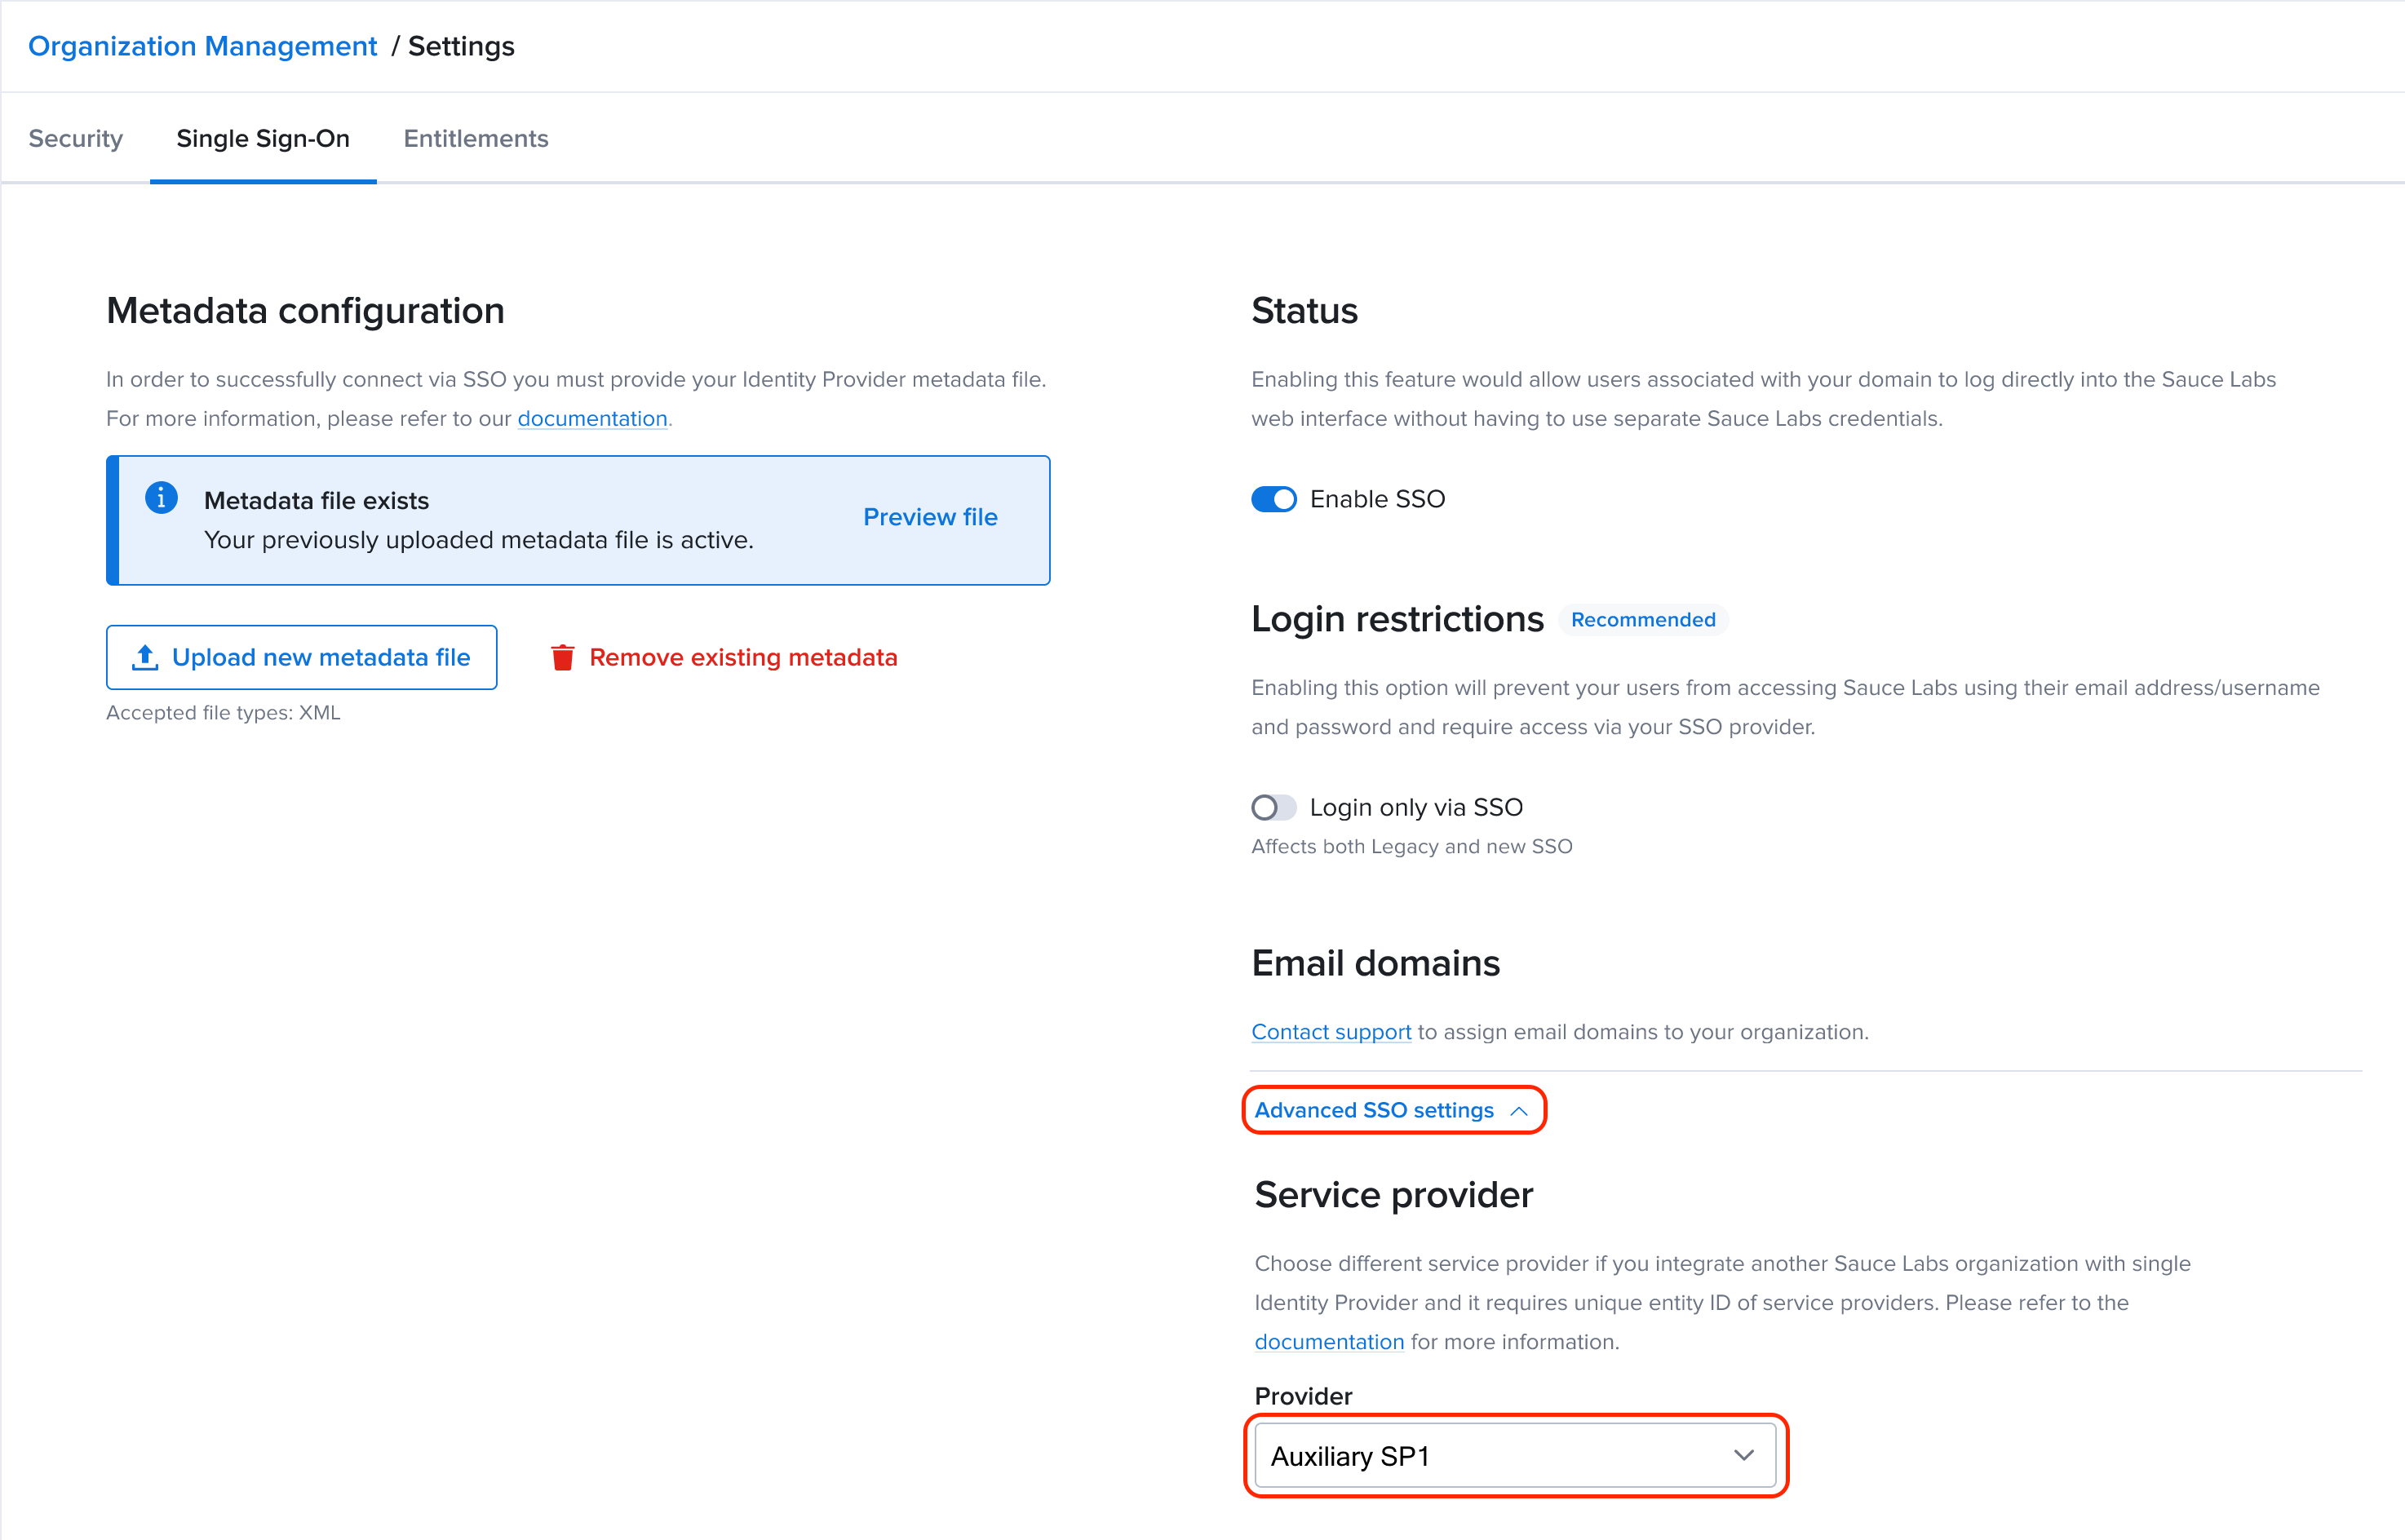
- The only additional action that you need to do, while you are in the Single Sign-On Configuration in Sauce Labs Organization Management, is to expand the section Advanced SSO Settings and in the dropdown list Service Provider select Auxiliary SP1.
Multiple Organizations with the Same Email Domain at Sauce Labs
Problem Description
In some cases, your company may have multiple organizations set up within Sauce Labs, which is a recommended configuration by the Sauce Labs support team. However, a problem arises when you have a single common email domain that is used across multiple Sauce Labs organizations.
The issue originates from the fact that you can only assign your company email domains to a single organization within Sauce Labs. Consequently, new users from other organizations within your company are unable to sign up through the Sauce Labs login page using Service Provider initiated SSO.
Solution
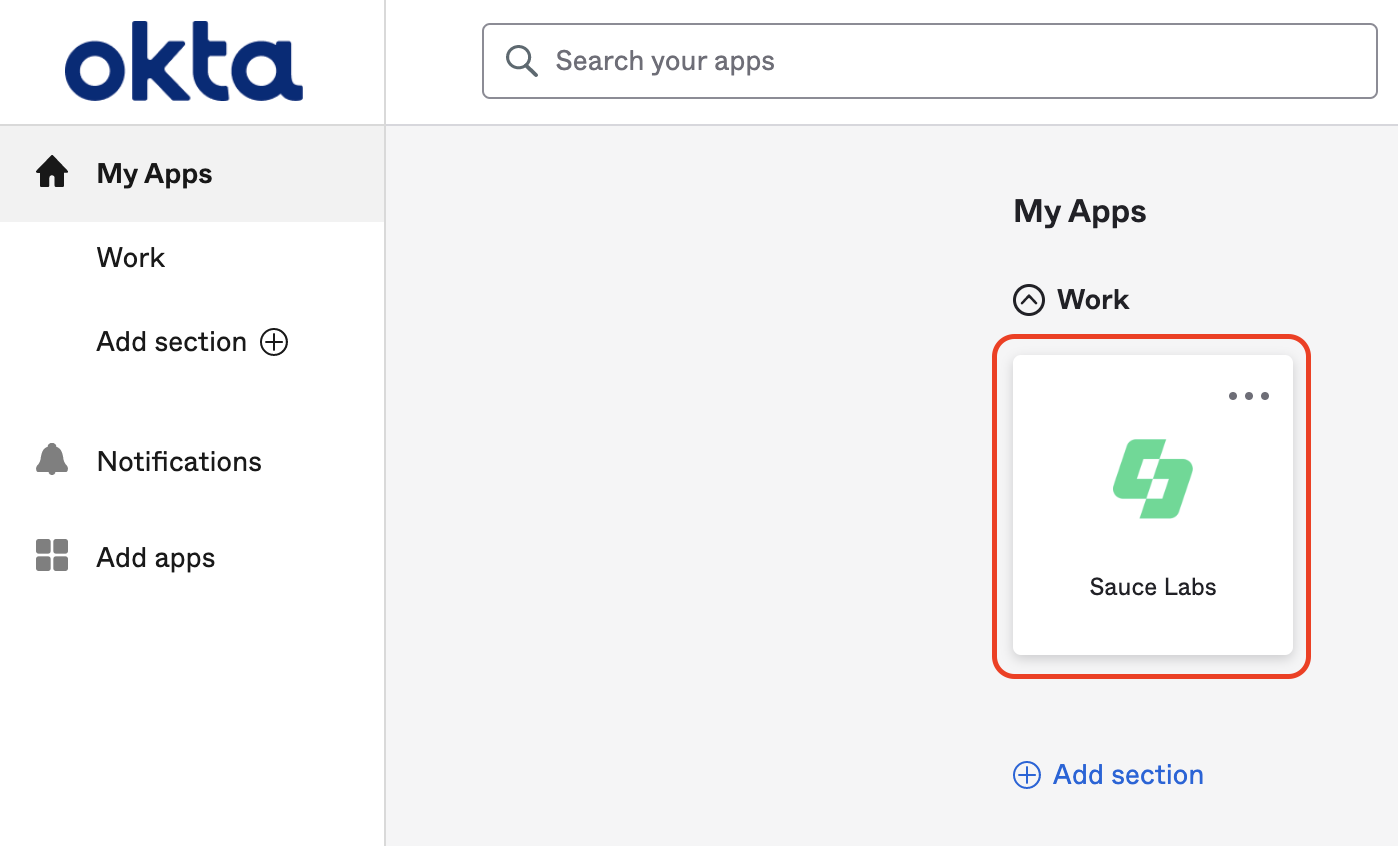
To resolve this issue, new users must initially log into Sauce Labs using the Identity Provider initiated flow. This involves starting the login process within your Identity Provider by clicking the Sauce Labs app tile. For example, in the Okta dashboard, it appears as follows:
Once the user is successfully authenticated, a new account is created at Sauce Labs. Subsequently, these users can use the SP-initiated SSO flow and log in through the Sauce Labs login page by clicking the SSO button and providing their email address.
