Test Annotation
Test annotation refers to adding information to your tests, such as a name, build number, tag, and pass/fail status. These annotations are useful for managing your tests and builds (for example, when filtering tests in your Test Results).
You can add annotations after test execution with our REST API or during test execution with the Selenium JavaScript Executor. You can also use sample test frameworks to automatically add annotations to your tests.
What You'll Need
- A Sauce Labs account (Log in or sign up for a free trial license)
- Your Sauce Labs Username and Access Key
Selenium JavaScript Executor
Selenium's JavascriptExecutor lets you use JavaScript commands in your test scripts to perform actions in the browser. We've developed a set of custom JavascriptExecutor methods you can use to annotate tests and record pass/fail status. You can also use these methods to track information in your Selenium log for debugging.
Basic Example
Here's a Java code sample setting a job's name to "My test":
((JavascriptExecutor)driver).executeScript("sauce:job-name=My test");
Methods
Appium JS-Executor methods for Real Device Testing in Sauce Labs are limited and are indicated with the following badge: RDC ✓
| Method | Description |
|---|---|
"sauce:job-result=passed" RDC ✓ | Sets the pass/fail status of the job. Options are passed, failed, true, and false. True means passed and false means failed. |
"sauce:job-name=My awesome job" RDC ✓ | Sets the job name |
"sauce:job-tags=tag1,tag2,tag3" | Sets the job tags in a comma-separated list. |
"sauce:job-build=mybuild123" | Sets the job’s build name. |
"sauce: stop network""sauce: start network" | Stops and restart the VM’s network connection (Mac OSX only). |
"sauce: disable log""sauce: enable log" | Turns off logging for certain commands within the test in order to omit sensitive data from the log.json file; then re-enables logging.NOTE: This method does not omit the commands from other possible records. |
"sauce: break" | Sets a Sauce breakpoint in the test. Test execution will pause at this point, waiting for manual control by clicking in the test’s live video. |
"sauce:context=This line appears in the command list as 'info'" RDC ✓ | Logs the given line in the job’s Selenium commands list. |
"sauce:job-info={'build':'mybuild','name':'my test name', 'public':'team}" | Sets one or more job information fields to the values sent in the JSON-formatted dictionary. |
"sauce:inject-image=[base64_encoded_image]" RDC ✓ | Points to file for testing image injection (e.g., barcode scanning). |
"sauce:performanceEnable" | Allows performance metrics to be collected. |
"mobile:deepLink" | Opens the given URL with the default or the given application. This functionality is only available since iOS version 17. The following arguments are supported: url (required) The URL to be opened; bundleId (optional) The bundle identifier of an application to open the given url with. If not provided then the default application for the given url scheme is going to be used. |
"sauce:performanceDisable" | Pauses performance metrics collection. |
Spacing in the methods is sensitive, i.e., some methods require a space following sauce: (stop, start, disable, enable, break, and job-info), while other methods do not.
Setting Pass/Fail
Setting the pass/fail status of your tests is important for getting the most out of your insights, as Selenium has only three built-in states: In Progress, Error, and Complete.
You should update your tests to record pass/fail status with our REST API on completion, using a test framework, or the sauce:job-result method.
Code Example
This code is from a sample Java test script using TestNG. You can find the full version in our Test Frameworks repository.
/**
      * Method that gets invoked after test.
      * Dumps browser log and
      * Closes the browser
      */

    @AfterMethod

    public void tearDown(ITestResult result) throws Exception {

        //Gets browser logs if available.
        ((JavascriptExecutor) webDriver.get()).executeScript("sauce:job-result=" + (result.isSuccess() ? "passed" : "failed"));
        webDriver.get().quit();
    }
Providing Context for Selenium or Appium Commands
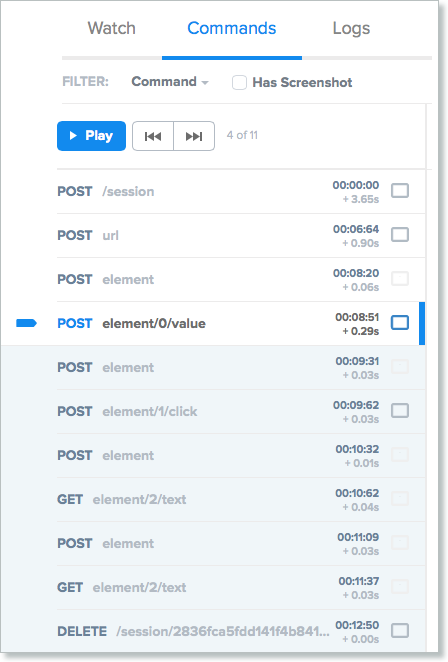
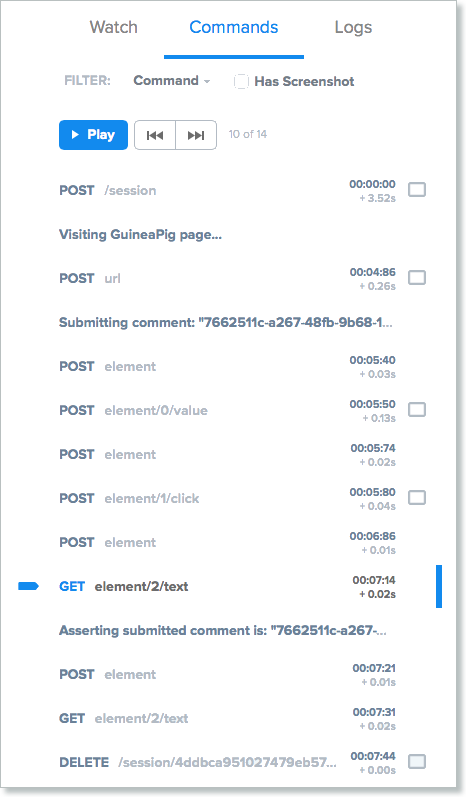
One of the most difficult aspects of troubleshooting Selenium or Appium tests can be matching commands to actions. The sauce:context method provides you with a way to inject text into the command log to associate with a specific command, essentially adding a comment.
For example, in the command log on the left, it's hard to immediately see which command is responsible for following a link to the page, which one submitted a comment, and which one asserted that the comment was valid. In the screenshot on the right, each set of commands has been provided with a context.


Code Example
In your TestBase.java script, assign a context with each step of the test is set using the sauce:context method.
The following code examples are from the Java-TestNG-Selenium framework in our GitHub repository.
/**
      * Method to be invoked after test.
      * Dumps browser log and
      * Closes the browser
      */

    @AfterMethod

    public void tearDown(ITestResult result) throws Exception {

        //Gets browser logs if available.
        ((JavascriptExecutor) webDriver.get()).executeScript("sauce:job-result=" + (result.isSuccess() ? "passed" : "failed"));
        webDriver.get().quit();
    }

    protected void annotate(String text) {
        ((JavascriptExecutor) webDriver.get()).executeScript("sauce:context=" + text);
    }
}
In your test script, specify the text you want associated with each step of the test:
public class TextInputTest extends TestBase {

    /**
      * Runs a simple test verifying if the comment input is functional.
      * @throws InvalidElementStateException
      */

    @org.testng.annotations.Test(dataProvider = "hardCodedBrowsers")
    public void verifyCommentInputTest(String browser, String version, String os, Method method)
            throws MalformedURLException, InvalidElementStateException, UnexpectedException {
        this.createDriver(browser, version, os, method.getName());
        WebDriver driver = this.getWebDriver();


        String commentInputText = UUID.randomUUID().toString();
        this.annotate("Visiting GuineaPig page...");
        GuineaPigPage page = GuineaPigPage.visitPage(driver);


        this.annotate(String.format("Submitting comment: \"%s\"", commentInputText));
        page.submitComment(commentInputText);

        this.annotate(String.format("Asserting submitted comment is: \"%s\"", commentInputText));
        Assert.assertTrue(page.getSubmittedCommentText().contains(commentInputText));

    }
Sauce Labs REST API
Virtual Devices Only
You can manage your tests more effectively from your Dashboard with annotations. The Sauce Labs REST API includes an update_job method that you can use to set a name, tags, pass/fail status, and custom data for your test after it runs. To automate test annotation with this method, you'll want to create a simple set of functions to perform the put request for you.
In addition to using the REST API to set these annotations once your test completes, you can use one of the Sauce Labs test framework examples to set these and other annotations for you automatically as part of the test execution.
Desired Capabilities for Annotation
You can set the following test configuration options to keep track of your jobs:
| Option | Description | Key | Value Type | Example |
|---|---|---|---|---|
| Test Names | Used to record test names for jobs and make it easier to find individual tests | name | string | "name" : "my example name" |
| Build Numbers | Used to associate jobs with a build number or app version, displayed on the Dashboard views | build | string | "build": "build-1234" |
| Tagging | User-defined tags for grouping and filtering jobs in the Dashboard | tags | list | "tags": ["tag1","tag2","tag3"] |
| Pass/Fail Status | Selenium and Appium handle sending commands to control a browser or app, but don't report to the server whether a test passed or failed. To record pass/fail status on Sauce, set the passed flag on the job. Since you can't know in advance whether a test passed or failed, this flag can't be set in the initial configuration. | passed | boolean | "passed": "true" |
| Custom Data | User-defined custom data that will accept any valid JSON object, limited to 64KB in size. | customData | object | "customData": {"release": "1.0", "commit": "0k392a9dkjr", "staging": true, "execution_number": 5, "server": "test.customer.com"} |
Examples
Setting Job Info with cURL for OS X/Linux
curl -X PUT \
-s -d '{"passed": true}' \
-u YOUR_USERNAME:YOUR_ACCESS_KEY \
https://saucelabs.com/rest/v1/YOUR_USERNAME/jobs/YOUR_JOB_ID
Setting Job Info with cURL for Windows
curl -X PUT
-s -d "{\"passed\": true}"
-u YOUR_USERNAME:YOUR_ACCESS_KEY
https://saucelabs.com/rest/v1/YOUR_USERNAME/jobs/YOUR_JOB_ID
Setting Job Info Using JSON
{
      "name": "my job name",
      "passed": true,
      "public": "public",
      "tags": ["tag1", "tag2", "tag3"],
      "build": 234,
      "customData": {
          "release": "1.0",
          "s erver": "test.customer.com"
      }
  }
Use Build IDs, Tags, and Names to Identify Your Tests
By assigning unique attributes (such as test name, tags, and build ID) in your test capabilities, you can then apply these annotations to filter results on your Sauce Labs Test Results and Archive pages. Although not required, following this best practice can make it easier to monitor tests and builds in your CI pipeline.
You can set these capabilities to be any combination of letters and numbers. To differentiate between builds, it's also a good practice to add a timestamp or CI job/build number at the end of your build tag.
While it's technically possible to use the same build name for multiple test runs, this will cause all of your test results to appear incorrectly as part of a single run. This, in turn, will cause your test results for those builds to be inaccurate.
Code Examples: Build, Tags, and Name
- Java
- C#
- Node.js
- Python
- Ruby
String username = System.getenv("SAUCE_USERNAME");
String accessKey = System.getenv("SAUCE_ACCESS_KEY");
MutableCapabilities sauceOptions = new MutableCapabilities();
sauceOptions.setCapability("name", "Web Driver demo Test");
sauceOptions.setCapability("tags", "tag1");
sauceOptions.setCapability("build", "build-1234");
sauceOptions.setCapability("username", username);
sauceOptions.setCapability("accessKey", accessKey);

FirefoxOptions firefoxOptions = new FirefoxOptions();
firefoxOptions.setCapability("sauce:options", sauceOptions);
firefoxOptions.setCapability("platformName", "Windows 10");
firefoxOptions.setCapability("browserVersion", "79.0");
WebDriver driver = new RemoteWebDriver(new URL("https://ondemand.us-west-1.saucelabs.com/wd/hub"), firefoxOptions);
string _sauceUsername = Environment.GetEnvironmentVariable("SAUCE_USERNAME", EnvironmentVariableTarget.User);
string _sauceAccessKey = = Environment.GetEnvironmentVariable("SAUCE_ACCESS_KEY", EnvironmentVariableTarget.User);
var sauceOptions = new Dictionary<string, object>
{
    ["username"] = _sauceUsername,
    ["accessKey"] = _sauceAccessKey,
    ["name"] = "Web Driver demo Test",
    ["build"] = "build-1234",
    ["tags"] = "tag1"
};
var firefoxOptions = new FirefoxOptions()
{
    BrowserVersion = "79.0",
    PlatformName = "Windows 10",
    UseSpecCompliantProtocol = true
};
firefoxOptions.AddAdditionalCapability("sauce:options", sauceOptions, true);
IWebDriver driver = new RemoteWebDriver(new Uri("https://ondemand.us-west-1.saucelabs.com/wd/hub"), firefoxOptions.ToCapabilities(), TimeSpan.FromSeconds(600));
const username = process.env.SAUCE_USERNAME
const accessKey = process.env.SAUCE_ACCESS_KEY
const tags = ['tag1', 'tag2', 'tag3']
const driver = new webdriver.Builder()
.withCapabilities({
browserName: 'firefox',
platform: 'Windows 10',
version: '79.0',
'sauce:options': {
name: 'Web Driver demo Test',
build: 'build-1234',
tags: tags,
username: username,
accessKey: accessKey
}
})
.usingServer('https://ondemand.us-west-1.saucelabs.com:443/wd/hub')
.build()
sauce_username = os.environ["SAUCE_USERNAME"]
sauce_access_key = os.environ["SAUCE_ACCESS_KEY"]
sauceOptions = {
    "build": "build-1234",
    “name”: “Web Driver demo Test”,
    “tags”: [ "tag1", "tag2", "tag3" ]
}
browserOptions =  {
    'platformName':"Windows 10",
    'browserName': "firefox",
    'browserVersion': '79.0',
    'sauce:options': sauceOptions
}
browser = webdriver.Remote(“https://ondemand.us-west-1.saucelabs.com/wd/hub”, desired_capabilities=browserOptions)
caps = {
    browser_name: 'firefox',
    platform_name: 'windows 10',
    browser_version: '79.0',
    "sauce:options" => {
        name: 'Web Driver demo Test',
        build: 'build-1234',
        tags: 'tag1',
        username: ENV['SAUCE_USERNAME'],
        access_key: ENV['SAUCE_ACCESS_KEY']
    }
}
driver = Selenium::WebDriver.for(:remote,
    url: 'https://ondemand.us-west-1.saucelabs.com:443/wd/hub',
    desired_capabilities: caps)